
Chaos Engineering with DocumentDB
Gremlin is a simple, safe and secure service for performing Chaos Engineering experiments through a SaaS-based platform. Amazon DocumentDB is a MongoDB-compatible database. Datadog is a monitoring service for cloud-scale applications, providing monitoring of servers, databases, tools, and services, through a SaaS-based data analytics platform.
This tutorial shows:
- How to create an AWS VPC for your DocumentDB cluster
- How to create a DocumentDB Cluster in your VPC
- How to create a Bastion Host in the same VPC
- How to SSH into your Bastion Host and install the MongoDB Shell
- How to Install Gremlin on your Bastion Host to practice Chaos Engineering
- How to connect to your DocumentDB cluster
- Chaos Engineering: Run a blackhole attack using Gremlin
Chaos Engineering Hypothesis
For the purposes of this tutorial we will run Chaos Engineering experiments on the DocumentDB cluster and individual instances. We will focus on network related Chaos Engineering attacks.
Prerequisites
- An Amazon AWS account (sign up here)
- A Gremlin account (sign up here)
- A Datadog account(sign up here)
Step 1 - Create a VPC for Amazon DocumentDB
In this step, you’ll setup a VPC for your Amazon DocumentDB cluster.
Navigate to the AWS VPC console for the EU West 1 region.
Make sure you have a default VPC for cluster in EU-West-1, if not click to create a default VPC:The default VPC we will be using for this tutorial is: vpc-2e9e4349. Use the default security group for your default VPC.
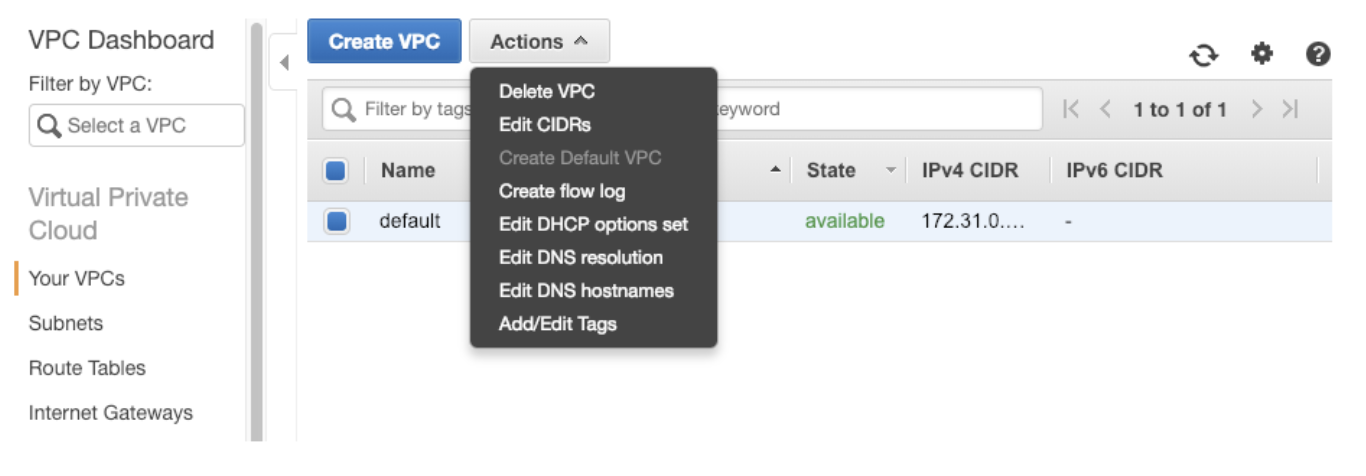
The default VPC for the region will automatically have 3 subnets in different regions for your use.

You will need to ensure the security group you are using for your VPC allows access to your MongoDB cluster on port 27017 (default). To do this visit Security Groups in the VPC Dashboard.
You will need to ensure you have the following inbound rules as shown below:
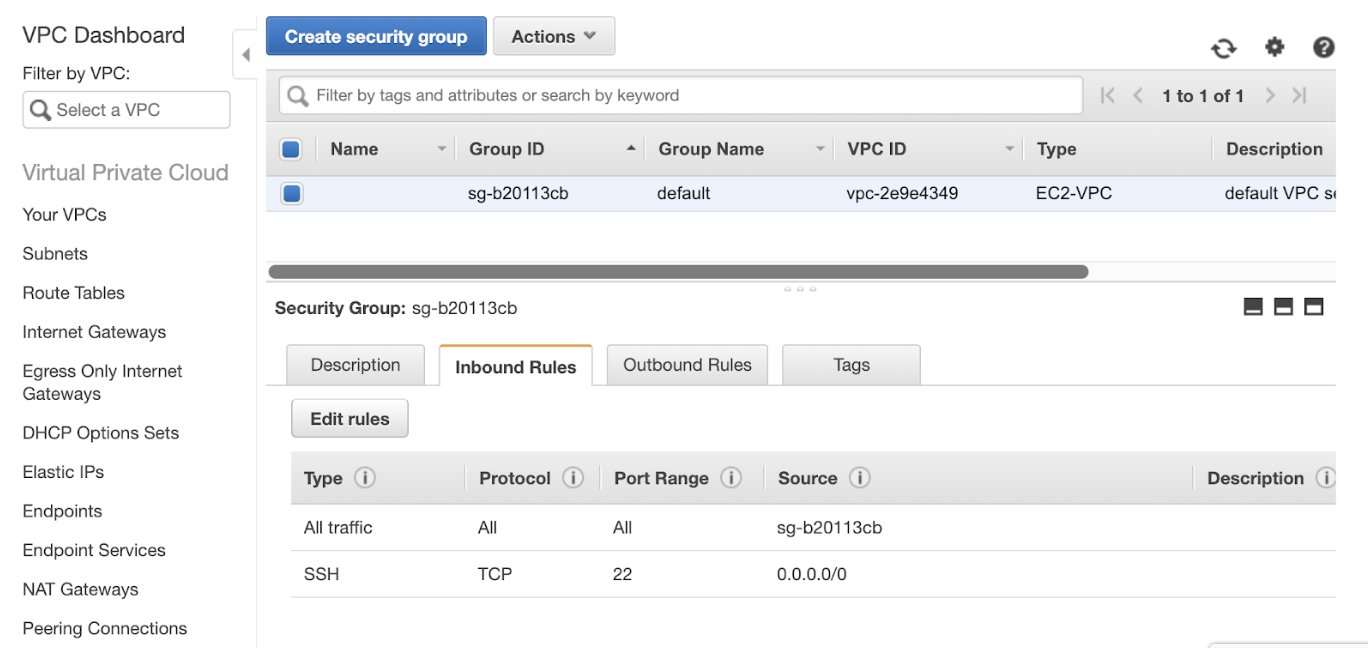
You will also need to ensure you have the following outbound rules as shown below:

Step 2 - Create an Amazon DocumentDB Cluster in your VPC
Now to create a DocDB cluster. First click on the create button:

When creating your VPC you will need to use specific settings to ensure you can appropriately use your Amazon DocumentDB cluster.
- VPC - This is the default VPC in EU-west-1 from step 1
- User - You will need to create a username for your cluster
- Password - You will need to create a password for your cluster
- Security group - Use the default security group for EU-west-1 as mentioned earlier. You will need to update the rules for your security group. Ensure you can access port 27017 which is the default port for DocumentDB.
When you create the AWS DocumentDB cluster it will automatically create three instances for you.

Step 3 - Create a Bastion Host in the same VPC
In this step you will create a bastion host in the same availability zone as your DocDB writer. The first instance in the list will be your DocDB writer. You can identify what region it is in by clicking on the instance and finding the availability zone information. For example, our example DocDB writer is in eu-west-1b.
Navigate to the EC2 console and click to create a new instance. Use an Ubuntu t2.micro. As your EC2 instance for your bastion host. You will need to make sure it is in the same vpc, e.g. vpc-2e9e4349 and has the same security group, e.g. sg-b20113cb (default)
You will need to update the rules for your default security group to enable it to work with your Amazon DocumentDB cluster.
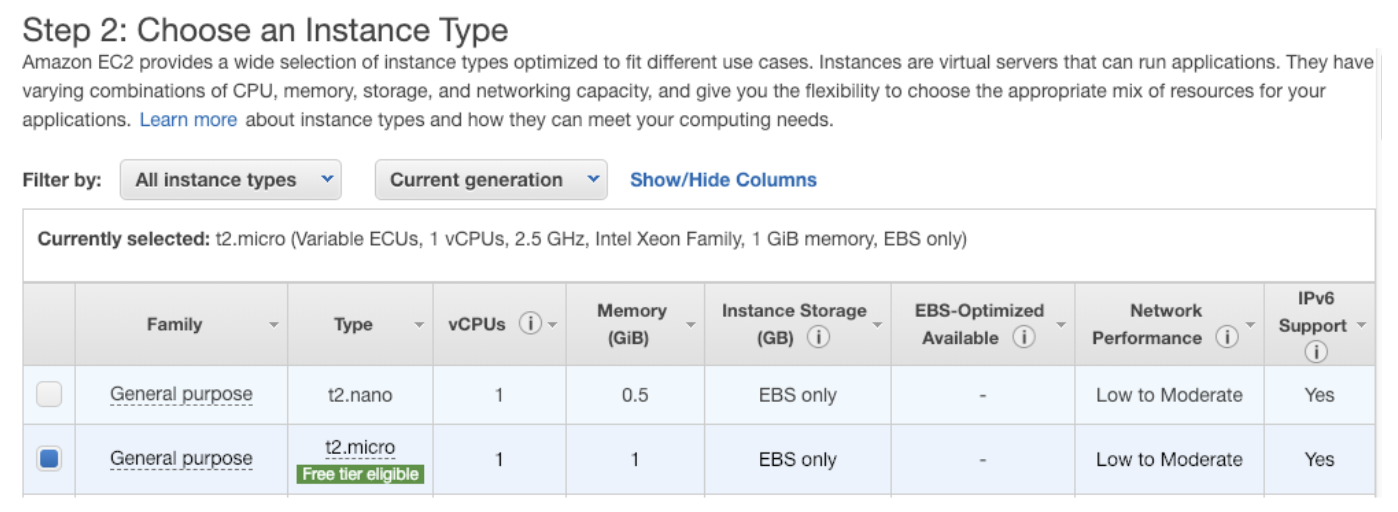
When you create your instance use an existing keys or generate a new key.

Step 4 - SSH into your Bastion Host and install the MongoDB Shell
In this step you will SSH into the bastion host and install the MongoDB shell.
Use the following commands to SSH into your bastion host replacing the instance and key with your own:
1ssh -i "chaoseu.pem" ubuntu@ec2-54-246-234-113.eu-west-1.compute.amazonaws.com
Next you will need to get your bastion host ready to connect to mongodb:
1sudo apt-get update sudo apt-key adv --keyserver hkp://keyserver.ubuntu.com:80 --recv 2930ADAE8CAF5059EE73BB4B58712A2291FA4AD5echo "deb [ arch=amd64,arm64 ] https://repo.mongodb.org/apt/ubuntu xenial/mongodb-org/3.6 multiverse" | sudo tee /etc/apt/sources.list.d/mongodb-org-3.6.listsudo apt-get updatesudo apt-get install -y mongodb-org-shell
Lastly you will need to get the rds combined ca bundle, you will need this to be able to connect to MongoDB:
1wget https://s3.amazonaws.com/rds-downloads/rds-combined-ca-bundle.pem
Step 5 - Install Gremlin on your Bastion Host to practice Chaos Engineering
In this step we will install Gremlin on our bastion host so we can run Chaos Engineering attacks. This will enable us to trigger attacks on our Amazon DocumentDB cluster.
First, ssh into your server and add the Gremlin Debian repository:
1echo "deb https://deb.gremlin.com/ release non-free" | sudo tee /etc/apt/sources.list.d/gremlin.list
Import the repo’s GPG key:
1sudo apt-key adv --keyserver keyserver.ubuntu.com --recv-keys C81FC2F43A48B25808F9583BDFF170F324D41134 9CDB294B29A5B1E2E00C24C022E8EF3461A50EF6
Then install the Gremlin daemon and CLI:
1sudo apt-get update && sudo apt-get install -y gremlind gremlin
The Gremlin daemon (gremlind) connects to the Gremlin backend and waits for attack orders from you. When it receives attack orders, it uses the CLI (gremlin) to run the attack.
Run gremlin init to configure the Gremlin daemon:
1gremlin init
You will be prompted to enter your Gremlin Team ID and Secret which you can find in the Gremlin UI under Team Settings.
Step 6 - Connect to your DocumentDB cluster
In this step you will connect to your Amazon DocumentDB cluster using your bastion host. You can find the command you will need to run in the DocumentDB console.
1mongo --ssl --host docdb-2019-01-21-22-59-38.cjpjmhyy8fch.eu-west-1.docdb.amazonaws.com:27017 --sslCAFile rds-combined-ca-bundle.pem --username tammy --password <insertYourPassword>
If successful, you will see the following result:
1MongoDB shell version v3.6.10connecting to: mongodb://docdb-2019-01-21-22-59-38.cjpjmhyy8fch.eu-west-1.docdb.amazonaws.com:27017/?gssapiServiceName=mongodbImplicit session: session { "id" : UUID("ee936a56-530d-4551-92e9-b629c7e7ad2b") }MongoDB server version: 3.6.0Welcome to the MongoDB shell.For interactive help, type "help".For more comprehensive documentation, see http://docs.mongodb.org/Questions? Try the support group http://groups.google.com/group/mongodb-userrs0:PRIMARY>
Next type help at the MongoDB shell prompt and it will return the following:
1db.help() help on db methods db.mycoll.help() help on collection methods sh.help() sharding helpers rs.help() replica set helpers help admin administrative help help connect connecting to a db help help keys key shortcuts help misc misc things to know help mr mapreduce show dbs show database names show collections show collections in current database show users show users in current database show profile show most recent system.profile entries with time >= 1ms show logs show the accessible logger names show log [name] prints out the last segment of log in memory, 'global' is default use <db_name> set current database db.foo.find() list objects in collection foo db.foo.find( { a : 1 } ) list objects in foo where a == 1 it result of the last line evaluated; use to further iterate DBQuery.shellBatchSize = x set default number of items to display on shell exit quit the mongo shell
Now we are going to load in some sample data, at the prompt type the following:
1db.inventory.insertMany([... // MongoDB adds the _id field with an ObjectId if _id is not present... { item: "journal", qty: 25, status: "A",... size: { h: 14, w: 21, uom: "cm" }, tags: [ "blank", "red" ] },... { item: "notebook", qty: 50, status: "A",... size: { h: 8.5, w: 11, uom: "in" }, tags: [ "red", "blank" ] },... { item: "paper", qty: 100, status: "D",... size: { h: 8.5, w: 11, uom: "in" }, tags: [ "red", "blank", "plain" ] },... { item: "planner", qty: 75, status: "D",... size: { h: 22.85, w: 30, uom: "cm" }, tags: [ "blank", "red" ] },... { item: "postcard", qty: 45, status: "A",... size: { h: 10, w: 15.25, uom: "cm" }, tags: [ "blue" ] }... ]);
You will see the following result if successful:
1{ "acknowledged" : true, "insertedIds" : [ ObjectId("5c46564ee867ed2238962d54"), ObjectId("5c46564ee867ed2238962d55"), ObjectId("5c46564ee867ed2238962d56"), ObjectId("5c46564ee867ed2238962d57"), ObjectId("5c46564ee867ed2238962d58") ]}
To retrieve the data you inserted run the following command at the mongodb shell prompt:
1rs0:PRIMARY> db.inventory.find( {} )
You will see the following result if successful:
1{ "_id" : ObjectId("5c46564ee867ed2238962d54"), "item" : "journal", "qty" : 25, "status" : "A", "size" : { "h" : 14, "w" : 21, "uom" : "cm" }, "tags" : [ "blank", "red" ] }{ "_id" : ObjectId("5c46564ee867ed2238962d55"), "item" : "notebook", "qty" : 50, "status" : "A", "size" : { "h" : 8.5, "w" : 11, "uom" : "in" }, "tags" : [ "red", "blank" ] }{ "_id" : ObjectId("5c46564ee867ed2238962d56"), "item" : "paper", "qty" : 100, "status" : "D", "size" : { "h" : 8.5, "w" : 11, "uom" : "in" }, "tags" : [ "red", "blank", "plain" ] }{ "_id" : ObjectId("5c46564ee867ed2238962d57"), "item" : "planner", "qty" : 75, "status" : "D", "size" : { "h" : 22.85, "w" : 30, "uom" : "cm" }, "tags" : [ "blank", "red" ] }{ "_id" : ObjectId("5c46564ee867ed2238962d58"), "item" : "postcard", "qty" : 45, "status" : "A", "size" : { "h" : 10, "w" : 15.25, "uom" : "cm" }, "tags" : [ "blue" ] }
You can browse more MongoDB tutorials here: https://docs.mongodb.com/manual/tutorial/getting-started/
Step 7 - Now You Are Ready to Practice Chaos Engineering
It is possible to run many Chaos Engineering experiments to learn more about the reliability and durability of Amazon DocumentDB. First we must decide where to start.
DocDB has many promises including:
- “On instance failure, Amazon DocumentDB automates failover to one of up to 15 Amazon DocumentDB replicas that you create in other Availability Zones. If no replicas have been provisioned and a failure occurs, Amazon DocumentDB tries to create a new Amazon DocumentDB instance automatically.”
- “You can add replicas in minutes regardless of the storage volume size.”
- “The backup capability in Amazon DocumentDB enables point-in-time recovery for your cluster. This feature allows you to restore your cluster to any second during your retention period, up to the last 5 minutes.”
- “Process millions of user requests per second with millisecond latency.”
We can use Gremlin to practice Chaos Engineering. Gremlin will enable us to schedule Chaos Engineering attacks. It also has built in automated integrations for Slack and Datadog.
Step 8 - Chaos Engineering: Run a blackhole attack using Gremlin
First let’s start by setting up Gremlin to do Chaos Engineering for our DocDB cluster.
To perform our first Network Chaos Engineering attack we will inject failure while attempting to return results from the primary MongoDB instance.
Ensure you are connected to your MongoDB instance:
1mongo --ssl --host docdb-2019-01-21-22-59-38.cluster-cjpjmhyy8fch.eu-west-1.docdb.amazonaws.com:27017 --sslCAFile rds-combined-ca-bundle.pem --username tammy --password <insertYourPassword>
Identify the instance endpoint from the Amazon DocumentDB instance console, for example:
1docdb-2019-01-24-23-59-40.cjpjmhyy8fch.eu-west-1.docdb.amazonaws.com
Now you can run the Gremlin Blackhole Attack using the Gremlin UI. Navigate to New Attack and enter the endpoint as the hostname:
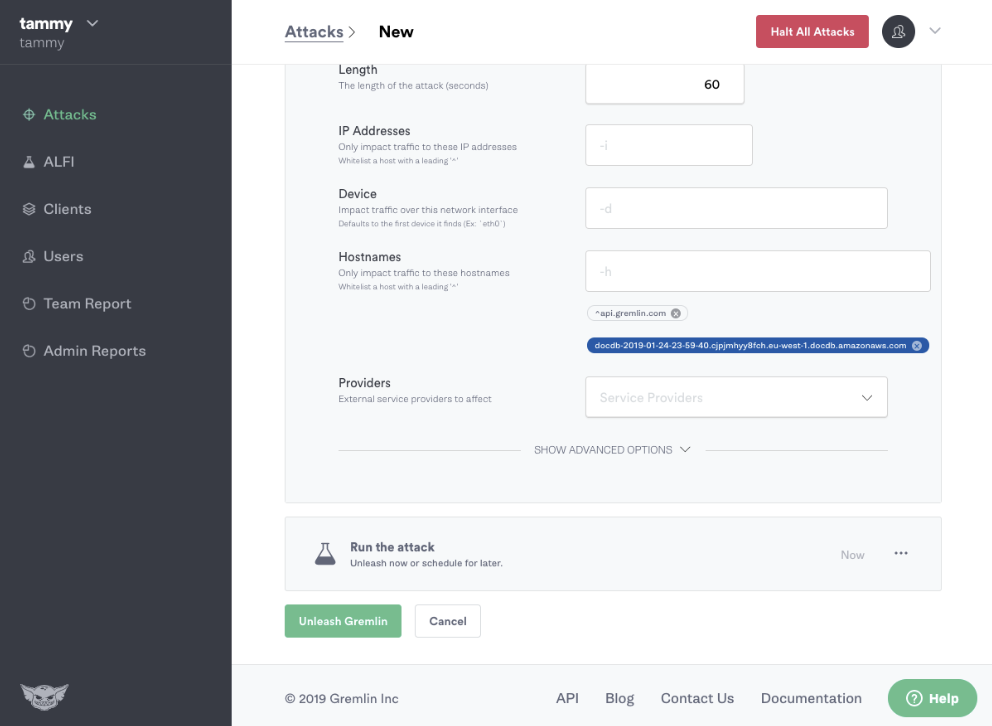
While running the Gremlin Blackhole attack, attempt to retrieve the data you inserted run the following command at the mongodb shell prompt:
1rs0:PRIMARY> db.inventory.find( {} )
You will notice that it will no longer return the results from DocumentDB.
By practicing Chaos Engineering in this way we can answer many questions, e.g:
- Are we monitoring for networking incidents?
- Can we accurately determine that this one Amazon DocumentDB instance is experiencing networking issues?
- Can we determine that the networking incident is a blackhole?
Conclusion
This tutorial has explored how to perform Chaos Engineering experiments on Amazon DocumentDB using Gremlin. We discovered some things about how we can use Gremlin to practice network Chaos Engineering and identified important questions to ask in regards to network monitoring and incident management.
Related


Avoid downtime. Use Gremlin to turn failure into resilience.
Gremlin empowers you to proactively root out failure before it causes downtime. See how you can harness chaos to build resilient systems by requesting a demo of Gremlin.
Get started